2014년 8월 30일 토요일

[Linux Kernel] 68주차(2014.08.30)

ARM10C 68주차 후기

일시 : 2014.08.30 (68주차)
모임명 : NAVER개발자커뮤니티지원_IAMROOT.ORG_10차ARM-C
장소 : 토즈 강남 타워점
장소지원: NAVER 개발자 커뮤니티 지원 프로그램
참여인원: 5명

스터디 진도 :

  • sched_init()

main.c::start_kernel()

asmlinkage void __init start_kernel(void)
{
...
    boot_cpu_init();
    // 현재 cpu(core id)를 얻어서 cpu_XXX_bits[] 의 cpu를 셋한다.

    page_address_init();
    // 128개의 page_address_htable 배열을 초기화
...
    setup_arch(&command_line);
...
    setup_nr_cpu_ids();
    setup_per_cpu_areas();
    // pcpu 구조체를 만들어 줌 (mm/percpu.c)

    smp_prepare_boot_cpu(); /* arch-specific boot-cpu hooks */
    // boot cpu 0의 pcpu 영역의 base주소를 core register에 설정해줌
...
    page_alloc_init();
    // cpu_chain에 page_alloc_cpu_notify를 연결함 (mutex lock/unlock 사용)
...
    vfs_caches_init_early();
    // Dentry cache, Inode-cache용 hash를 위한 메모리 공간을 각각 512kB, 256kB만큼 할당 받고,
    // 131072, 65536개 만큼 hash table을 각각 만듬
...
    mm_init();
    // buddy와 slab 을 활성화 하고 기존 할당 받은 bootmem 은 buddy,
    // pcpu 메모리, vmlist 는 slab으로 이관

    sched_init();
sched_init();
스케쥴러 초기화를 분석합니다.

core.c::sched_init()

// ARM10C 20140830
void __init sched_init(void)
{
    int i, j;
    unsigned long alloc_size = 0, ptr;
    // alloc_size: 0

#ifdef CONFIG_FAIR_GROUP_SCHED // CONFIG_FAIR_GROUP_SCHED=n
    alloc_size += 2 * nr_cpu_ids * sizeof(void **);
#endif
#ifdef CONFIG_RT_GROUP_SCHED // CONFIG_RT_GROUP_SCHED=n
    alloc_size += 2 * nr_cpu_ids * sizeof(void **);
#endif
#ifdef CONFIG_CPUMASK_OFFSTACK // CONFIG_CPUMASK_OFFSTACK=n
    alloc_size += num_possible_cpus() * cpumask_size();
#endif
    // alloc_size: 0
    if (alloc_size) {
        ptr = (unsigned long)kzalloc(alloc_size, GFP_NOWAIT);
#ifdef CONFIG_FAIR_GROUP_SCHED // CONFIG_FAIR_GROUP_SCHED=n
        root_task_group.se = (struct sched_entity **)ptr;
        ptr += nr_cpu_ids * sizeof(void **);

        root_task_group.cfs_rq = (struct cfs_rq **)ptr;
        ptr += nr_cpu_ids * sizeof(void **);

#endif /* CONFIG_FAIR_GROUP_SCHED */
#ifdef CONFIG_RT_GROUP_SCHED // CONFIG_RT_GROUP_SCHED=n
        root_task_group.rt_se = (struct sched_rt_entity **)ptr;
        ptr += nr_cpu_ids * sizeof(void **);

        root_task_group.rt_rq = (struct rt_rq **)ptr;
        ptr += nr_cpu_ids * sizeof(void **);

#endif /* CONFIG_RT_GROUP_SCHED */
#ifdef CONFIG_CPUMASK_OFFSTACK // CONFIG_CPUMASK_OFFSTACK=n
        for_each_possible_cpu(i) {
            per_cpu(load_balance_mask, i) = (void *)ptr;
            ptr += cpumask_size();
        }
#endif /* CONFIG_CPUMASK_OFFSTACK */
    }

#ifdef CONFIG_SMP // CONFIG_SMP=y
    init_defrootdomain();
    // def_root_domain의 맴버 값을 초기화 수행
    // (&def_root_domain->cpupri)->pri_to_cpu[0 ... 101].count: 0
    // &(&def_root_domain->cpupri)->pri_to_cpu[0 ... 101].mask.bit[0]: 0
    // (&def_root_domain->cpupri)->cpu_to_pri[0 ... 3]: -1
    // &def_root_domain.refcount: 1
#endif

    // global_rt_period(): 1000000000, global_rt_runtime(): 950000000
    init_rt_bandwidth(&def_rt_bandwidth,
            global_rt_period(), global_rt_runtime());
    // init_rt_bandwidth에서 한일:
    // (&def_rt_bandwidth)->rt_period: 1000000000
    // (&def_rt_bandwidth)->rt_runtime: 950000000
    // &(&def_rt_bandwidth)->rt_runtime_lock을 사용한 spinlock 초기화
    // (&def_rt_bandwidth)->rt_period_timer의 값을 0으로 초기화
    // &(&def_rt_bandwidth)->rt_period_timer)->base: &hrtimer_bases->clock_base[0]
    // (&(&(&def_rt_bandwidth)->rt_period_timer)->node)->node의 RB Tree의 초기화
    // &(&def_rt_bandwidth)->rt_period_timer.function: sched_rt_period_timer

#ifdef CONFIG_RT_GROUP_SCHED // CONFIG_RT_GROUP_SCHED=n
    init_rt_bandwidth(&root_task_group.rt_bandwidth,
            global_rt_period(), global_rt_runtime());
#endif /* CONFIG_RT_GROUP_SCHED */

#ifdef CONFIG_CGROUP_SCHED // CONFIG_CGROUP_SCHED=n
    list_add(&root_task_group.list, &task_groups);
    INIT_LIST_HEAD(&root_task_group.children);
    INIT_LIST_HEAD(&root_task_group.siblings);
    autogroup_init(&init_task);

#endif /* CONFIG_CGROUP_SCHED */

    for_each_possible_cpu(i) {
    // for ((i) = -1; (i) = cpumask_next((i), (cpu_possible_mask)), (i) < nr_cpu_ids; )
        struct rq *rq;

        // i: 0
        // cpu_rq(0):
        // &({
        //      do {
        //      const void __percpu *__vpp_verify = (typeof(&(runqueues)))NULL;
        //      (void)__vpp_verify;
        //      } while (0)
        //      (&(runqueues) + (pcpu_unit_offsets[0] + __per_cpu_start에서의pcpu_base_addr의 옵셋);
        // })
        rq = cpu_rq(i);
        // rq: (&(runqueues) + (pcpu_unit_offsets[0] + __per_cpu_start에서의pcpu_base_addr의 옵셋)

        // [pcp0] &rq->lock: &(runqueues)->lock
        raw_spin_lock_init(&rq->lock);
        // [pcp0] &rq->lock: &(runqueues)->lock 을 사용한 spinlock 초기화 수행

        // [pcp0] &rq->nr_running: &(runqueues)->nr_running
        rq->nr_running = 0;
        // [pcp0] &rq->nr_running: &(runqueues)->nr_running: 0

        // [pcp0] &rq->calc_load_active: &(runqueues)->calc_load_active
        rq->calc_load_active = 0;
        // [pcp0] &rq->calc_load_active: &(runqueues)->calc_load_active: 0

        // [pcp0] &rq->calc_load_update: &(runqueues)->calc_load_update,
        // jiffies: -30000 (0xFFFFFFFFFFFF8AD0): vmlinux.lds.S 에 있음, LOAD_FREQ: 501
        rq->calc_load_update = jiffies + LOAD_FREQ;
        // [pcp0] &rq->calc_load_update: &(runqueues)->calc_load_update: -29499 (0xFFFFFFFFFFFF8CC5)

        // [pcp0] &rq->cfs: &(runqueues)->cfs
        init_cfs_rq(&rq->cfs);
        // init_cfs_rq 에서 한일:
        // (&(runqueues)->cfs)->tasks_timeline: (struct rb_root) { NULL, }
        // (&(runqueues)->cfs)->min_vruntime: 0xFFFFFFFFFFF00000
        // (&(runqueues)->cfs)->min_vruntime_copy: 0xFFFFFFFFFFF00000
        // (&(runqueues)->cfs)->decay_counter: 1
        // (&(runqueues)->cfs)->removed_load: 0

        // [pcp0] &rq->rt: &(runqueues)->rt, rq: &(runqueues)
        init_rt_rq(&rq->rt, rq);
        // init_rt_rq 에서 한일:
        // (&(&(runqueues)->rt)->active)->bitmap의 0 ... 99 bit를 클리어
        // (&(&(runqueues)->rt)->active)->queue[0 ... 99] 의 리스트 초기화
        // (&(&(runqueues)->rt)->active)->bitmap의 100 bit를 1로 세팅
        // (&(runqueues)->rt)->rt_runtime_lock 을 사용한 spinlock 초기화
        // (&(runqueues)->rt)->rt_runtime: 0
        // (&(runqueues)->rt)->rt_throttled: 0
        // (&(runqueues)->rt)->rt_time: 0
        // (&(&(runqueues)->rt)->pushable_tasks)->node_list 리스트 초기화
        // (&(runqueues)->rt)->overloaded: 0
        // (&(runqueues)->rt)->rt_nr_migratory: 0
        // (&(runqueues)->rt)->highest_prio.next: 100
        // (&(runqueues)->rt)->highest_prio.curr: 100

// 2014/08/30 종료

study log

92e2dcc..7db0df3  master     -> origin/master
Updating 92e2dcc..7db0df3
Fast-forward
arch/arm/include/asm/processor.h |    3 +
arch/arm/kernel/vmlinux.lds.S    |    5 +
include/asm-generic/param.h      |    3 +
include/asm-generic/percpu.h     |   60 +-
include/linux/bitmap.h           |    2 +
include/linux/cache.h            |   15 +-
include/linux/cpumask.h          |   21 +-
include/linux/gfp.h              |    1 +
include/linux/hrtimer.h          |   12 +-
include/linux/jiffies.h          |    3 +
include/linux/ktime.h            |   13 +
include/linux/percpu-defs.h      |   33 +
include/linux/percpu.h           |  342 ++++++++
include/linux/plist.h            |    4 +
include/linux/rbtree.h           |   22 +-
include/linux/sched.h            |    3 +
include/linux/sched/rt.h         |    1 +
include/linux/slab.h             |   40 +-
include/linux/slub_def.h         |    1 +
include/linux/spinlock.h         |    2 +
include/linux/spinlock_types.h   |    1 +
include/linux/threads.h          |    1 +
include/linux/time.h             |    1 +
include/linux/timerqueue.h       |    8 +
include/linux/types.h            |    2 +
include/uapi/linux/time.h        |   10 +
init/main.c                      |    1 +
kernel/hrtimer.c                 |   69 +-
kernel/sched/core.c              |  118 ++-
kernel/sched/cpupri.c            |   20 +
kernel/sched/cpupri.h            |   14 +-
kernel/sched/fair.c              |   21 +-
kernel/sched/rt.c                |   66 +-
kernel/sched/sched.h             |   83 +-
kernel/timer.c                   |    5 +
lib/kasprintf.c                  |   14 +-
lib/rbtree.c                     |    6 +-
mm/percpu.c                      |   12 +-
mm/slab_common.c                 |  393 +++++----
mm/slub.c                        | 1629 +++++++++++++++++++-------------------
mm/vmalloc.c                     |   32 +-
41 files changed, 2025 insertions(+), 1067 deletions(-)
2014년 8월 27일 수요일

CentOS 7.0에서 네트워크 설정

CentOS 7.0에서 네트워크 설정

  • CentOS 7.0에서 네트워크 인터페이스의 명칭이 변경되었다.
  • 지금까지는 "eth ~" 였는데,
  • 7.0부터는 "en ~ ' 로 바뀌었다. (예. enp0s2)
  • 설정 파일의 위치는 : "/etc/sysconfig/network-script" 아래에 있다.
[test @ localhost ~] $ ls -la /etc/sysconfig/network-scripts/ifcfg*
-rw-r - r-- 1 root root 321 8 월 8 09:03 /etc/sysconfig/network-scripts/ifcfg-enp0s2
-rw-r - r-- 1 root root 254 8 월 3 09:30 /etc/sysconfig/network-scripts/ifcfg-lo

네트워크를 설정해 보자.

  • 기본은 dhcp로 되어있다.
HWADDR="00:00:29:08:A5:37"
TYPE="Ethernet"
BOOTPROTO="dhcp"
DEFROUTE="yes"
PEERDNS="yes"
PEERROUTES="yes"
IPV4_FAILURE_FATAL="no"
IPV6INIT="yes"
IPV6_AUTOCONF="yes"
IPV6_DEFROUTE="yes"
IPV6_PEERDNS="yes"
IPV6_PEERROUTES="yes"
IPV6_FAILURE_FATAL="no"
NAME="enp0s3"
UUID="b3d0246c-d2ba-49c7-98fb-2c394b30e29b"
ONBOOT="yes"

고정 IP로 바꿔보자.

  • 고정 IP "192.168.0.5"로 바꿔보자.
HWADDR="00:00:29:08:A5:37"
TYPE="Ethernet"
BOOTPROTO="none"
DEFROUTE="yes"
PEERDNS="yes"
PEERROUTES="yes"
IPV4_FAILURE_FATAL="no"
IPV6INIT="yes"
IPV6_AUTOCONF="yes"
IPV6_DEFROUTE="yes"
IPV6_PEERDNS="yes"
IPV6_PEERROUTES="yes"
IPV6_FAILURE_FATAL="no"
NAME="enp0s3"
UUID="b3d0246c-d2ba-49c7-98fb-2c394b30e29b"
ONBOOT="yes"

# IP Address
IPADDR = "192.168.0.5"
# Subnet Mask
NETMASK = "255.255.255.0"
# Default Gateway
GATEWAY = "192.168.0.1"
# DNS Server
DNS1 = "192.168.0.1"
  • 바뀐 부분은 세번째 줄에 "BOOTPROTO"의 값을 "dhcp"에서 "none"으로 변경하고,
  • (IP 주소, 서브넷 마스크, 기본 게이트웨이, DNS 서버)의 내용을 추가하면 된다.

설정 파일을 수정했다면 네트워크를 다시 시작한다.

systemctl restart NetworkManager
systemctl restart network

Cent OS 7.0의 네트워크 설정이 완료되었다.

2014년 8월 23일 토요일

Openstack Swift Objectstore Access via FTP

This is a guide on accessing the Openstack Swift Object Storage system using an FTP client. Openstack Swift has a beautiful API which you can program to. However, sometimes it is handy to quickly be able to access your Swift/Objectstore data without programming around it. We will use ftp-cloudfs to do this. There is also Softlayers swftp, but that does not support Keystone Authentication (2.0). ftp-cloudfs does support this. The OS X Cyberduck FTP client also has Openstack Swift support, however that is a native implementation, not using FTP. With ftp-cloudfs we can use any ftp client, from Filezilla to midnight commander.
We will be using the Dutch provider CloudVPS, which is the first European-only Openstack Public Cloud, therefore not bound to the Patriot Act, so your data is more safe than it is with a provider that is vulnerable to the Patriot Act. CloudVPS provides 10GB free ObjectStore, if you have VPS with them, the data is stored on at least 3 machines in 3 locations and they have a boatload of certifications (ISO 27001 etc).
If you order a VPS or Objectstore at CloudVPS, please mention my name or this article. I'll get a little referal bonus, which will be used to keep this awesome website running.
Note that this article is not sponsored nor endorsed by CloudVPS, nor am I speaking for or as CloudVPS. They just happen to be the best Dutch Openstack provider.
Openstack is one of those cloudy cloud projects. Warning, keep your buzzword bingo cards ready for the Wikipedia definition:
OpenStack is a free and open-source software cloud computing platform. It is primarily deployed as an infrastructure as a service (IaaS) solution. The technology consists of a series of interrelated projects that control pools of processing, storage, and networking resources throughout a data center, able to be managed or provisioned through a web-based dashboard, command-line tools, or a RESTful API. It is released under the terms of the Apache License.
Basically it is a very nice project which provides an easy and scalable way to:
  1. Virtualize (Compute / Nova) (KVM, VMWare, Xen)
  2. Provide scalable object access (Swift / Objectstore) (like s3)
  3. Manage it all using a nice dashboard (Horizon)
  4. Have a great API which lets people develop applications for it.
  5. Be open source. There is no vendor lock in, you can switch between any provider providing OpenStack.
In this tutorial we will focus on the Swift part, which provides s3 like access to files, or, objects.
As said, Swift has a very nice API to program to. For example, you can create an app for a TV show which streams extra video related to the TV show. This will be a one time peak in traffic, depending on the TV show it can get pretty high in volume. You don't want to set up all the capacity yourself, including scaling, distributing files over multiple servers and load balancing it all. Swift handles this for you. You do need to program to it, there is not an easy way (yet) to access it in your file browser for example.
The project ftp-cloudfs solves this partly by acting as a proxy between the Object Store API and an FTP client. Installation is easy, it can all be done via pip.

Requirements

You will need the following:
  • access to an Openstack Swift instance (CloudVPS for example)
  • python 2.7
    • python-keystoneclient (if you are going to use v2.0 authentication)
    • python-swiftclient
  • an ftp client
This tutorial was written and tested on Ubuntu 12.04 and CentOS 6, but works everywhere the above requirements can be met.

Installing packages

We need to make sure we have python 2, pip and the keystone client installed. For Ubuntu/Debian:
apt-get install python-pip
For CentOS/RHEL:
yum install python-pip
Now we are going to install ftp-cloudfs, swiftclient and keystoneclient using pip. You should do this in a python virtualenv, however that goes beyond the scope of this tutorial.
pip install ftp-cloudfs python-keystoneclient python-swiftclient

Running the FTP server

When that is all finished we can start the ftp proxy like so:
ftpcloudfs --foreground --keystone-auth --auth-url https://identity.stack.cloudvps.com/v2.0
This will start up the FTP server in the foreground on port 2021, talking to the CloudVPSSwift Object Store.
ftp-cloudfs has the following usage options:
Usage: ftpcloudfs [options]

Options:
  --version             show program's version number and exit
  -h, --help            show this help message and exit
  -p PORT, --port=PORT  Port to bind the server (default: 2021)
  -b BIND_ADDRESS, --bind-address=BIND_ADDRESS
                        Address to bind (default: 127.0.0.1)
  -a AUTHURL, --auth-url=AUTHURL
                        Authentication URL (required)
  --memcache=MEMCACHE   Memcache server(s) to be used for cache (ip:port)
  -v, --verbose         Be verbose on logging
  -f, --foreground      Do not attempt to daemonize but run in foreground
  -l LOG_FILE, --log-file=LOG_FILE
                        Log File: Default stdout when in foreground
  --syslog              Enable logging to the system logger (daemon facility)
  --pid-file=PID_FILE   Pid file location when in daemon mode
  --uid=UID             UID to drop the privilige to when in daemon mode
  --gid=GID             GID to drop the privilige to when in daemon mode
  --keystone-auth       Use auth 2.0 (Keystone, requires keystoneclient)
  --keystone-region-name=REGION_NAME
                        Region name to be used in auth 2.0
  --keystone-tenant-separator=TENANT_SEPARATOR
                        Character used to separate tenant_name/username in
                        auth 2.0 (default: TENANT.USERNAME)
  --keystone-service-type=SERVICE_TYPE
                        Service type to be used in auth 2.0 (default: object-
                        store)
  --keystone-endpoint-type=ENDPOINT_TYPE
                        Endpoint type to be used in auth 2.0 (default:
                        publicURL)
For CloudVPS, the username will be in the form of: TENANTNAME.EMAIL@ADDRESS.EXT. For example, BLA000066 Cinderella.user@example.org. If you have a tenant (tenant means project in Openstack terminology) with a dot in the name, you can use the--keystone-tenant-separator option to change it in, for example, a \ backslash.
Now use your FTP client to connect to the server and there's your Object Store. There are some limitations:
  • you can not place files in the top level folder, you need a subfolder. This is because top level are containers.
  • you can not rename a non-empty directory. You will get a550 Directory not empty. error.
  • you can not recursively delete a folder. That is handled by most clients, filezilla understands that it has to go in every folder and remove all the things and then remove the folder.
  • top level folders are created as private containers. You will need to change them to public if that is needed.
These limitations come from the fact that we are not talking to a file system block storage, but to object storage. Try to force a square through a circle, and then appreciate how well ftp-cloudfs handles this.
To set the ftp proxy open for other users, set the --bind-address to 0.0.0.0. Remember that there is no encryption on FTP, so make sure you handle that in a different way.

Authentication Data

If you are unsure about what data you should use to authenticate you can use theOpenstack API to get that data. Your provider may for example not have it in a logical place. The Openstack Horizon dashboard provides all the required data and URLs under the "Access and Security --> API Access".
First get an authentication token using cURL:
curl -i 'https://identity.stack.cloudvps.com/v2.0/tokens' -X POST -H "Content-Type: application/json" -H "Accept: application/json"  -d '{"auth": {"tenantName": "", "passwordCredentials": {"username": "user@example.com", "password": "passw0rd"}}}'
Response:
HTTP/1.1 200 OK
Vary: X-Auth-Token
Content-Type: application/json
Content-Length: 543
Connection: close

{
    "access": {
        "token": {
            "issued_at": "2014-05-19T03:24:50.971373",
            "expires": "2014-05-20T03:24:50Z",
            "id": "8g2CeQ3kM0tkRAEiu6KmGaI6M8NLFDJ8WQ"
        },
        "serviceCatalog": [],
        "user": {
            "username": "user@example.com",
            "roles_links": [],
            "id": "J0XPUWipImRpkFXAVxJYELAXnXx26jPPj9w",
            "roles": [],
            "name": "user@example.com"
        },
        "metadata": {
            "is_admin": 0,
            "roles": []
        }
    }
}
The token is the first id. In this case: 8g2CeQ3kM0tkRAEiu6KmGaI6M8NLFDJ8WQ.
Use the token to get a list of tenants for that token:
curl -i -X GET 'https://identity.stack.cloudvps.com/v2.0/tenants' -H "User-Agent: python-keystoneclient" -H "X-Auth-Token: 8g2CeQ3kM0tkRAEiu6KmGaI6M8NLFDJ8WQ"
Response:
HTTP/1.1 200 OK
Vary: X-Auth-Token
Content-Type: application/json
Content-Length: 523
Connection: close

{
    "tenants_links": [],
    "tenants": [
        {
            "handle": "HANDLE",
            "description": "HANDLE Projectname",
            "enabled": true,
            "id": "zORIDFV4ybpbV9bRg1gwNi7NNnTiCw",
            "name": "HANDLE Projectname"
        },
        {
            "handle": "HANDLE",
            "description": "Main Customer Tenant",
            "enabled": true,
            "id": "vnsdmwzPSl8dHm2RQQe",
            "name": "HANDLE"
        }
    ]
}
The part you want to have is the "name": "HANDLE Projectname" part. That is your tenant.

Screenshot

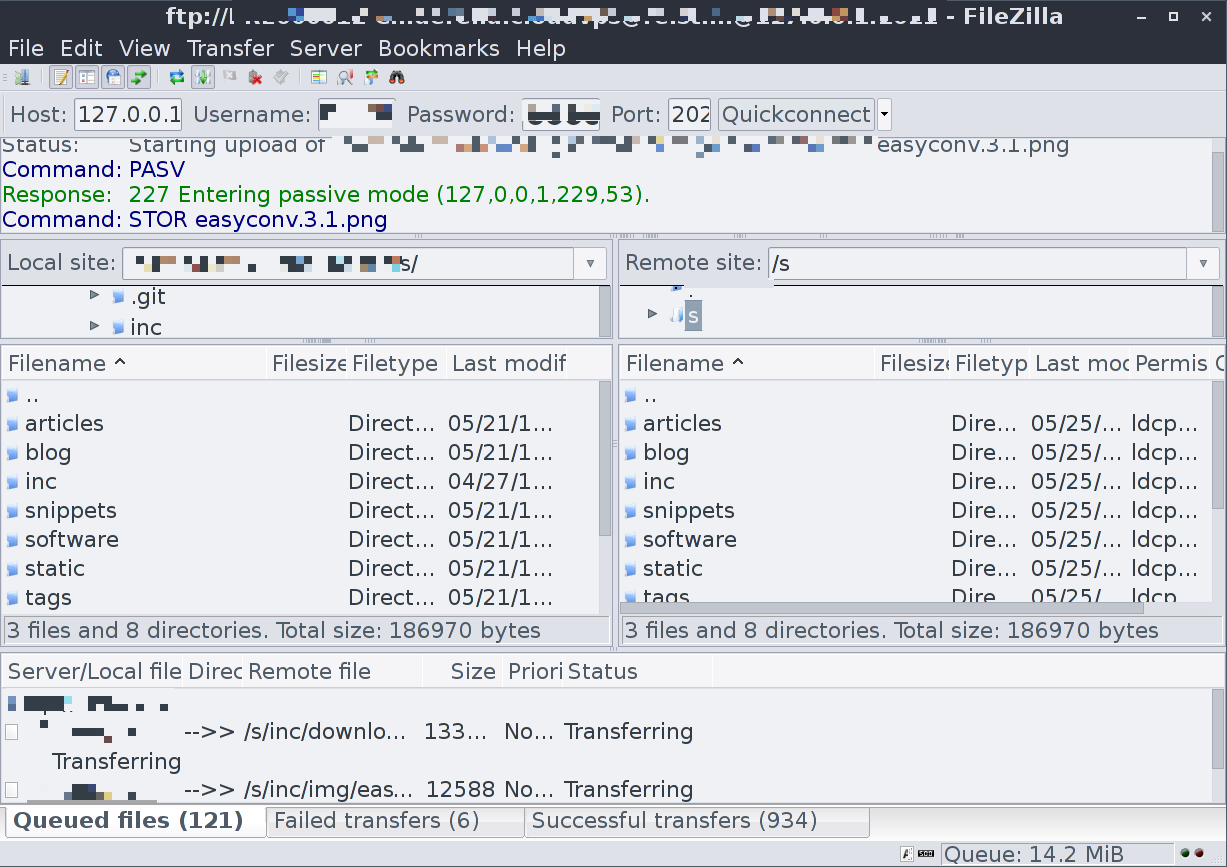
Here is a screenshot of Filezilla uploading a copy of this website to the Object Store:
filezilla

클라우드 오브젝트 스토리지 서비스 OpenStack Swift

클라우드 스토리지

클라우드 스토리지 (오브젝트 스토리지)

"클라우드"라는 말은 다양한 장르에서 사용되고 있지만,클라우드 스토리지 중 하나인 '클라우드 오브젝트 스토리지'가있다. 클라우드 스토리지라는 것은 그 이름에서 알 수 있듯이 인터넷을 통해 액세스 할 수 있는 데이터 저장 공간을 제공하는 것이다. 클라우드 스토리지에 저장된 데이터를 '객체'라고 부르기에서 "개체 스토리지 (Object Storage) '라고도 한다.

REST방식 교환

클라우드 스토리지가 일반적인 온라인 스토리지 서비스 및 NAS / SAN과 다른 것은 HTTP 기반의 REST 방식으로 데이터가 교환된다는 점이다. 저장된 데이터는 복제 된 여러 스토리지 서버에 저장되어 스토리지 서버의 일부가 정지했다고해도 데이터가 보호된다는 점이다. 비싼 전용 하드웨어가 필요없고, 일반적인 서버 및 스토리지의 조합만으로 고용량 안전한 스토리지 서비스를 구축 할 수 있다는 장점도있다.

Amazon S3

클라우드 스토리지에서 가장 유명한 것이 Amazon.com가 제공하는 "Amazon Web Services"의 하나 인 "Amazon Simple Storage Service (Amazon S3)」일 것이다. Amazon S3는 후속 서비스에 큰 영향을 미치고 Amazon S3 호환 API를 제공하는 클라우드 스토리지 서비스는 많다. 또한 Google의 "Google Cloud Storage"나 Microsoft의 'Windows Azure'등 서비스도 클라우드 스토리지 서비스를 제공하고있다.

OpenStack Swift

클라우드 스토리지 서비스를 오픈 소스를 이용해서 독자적으로 구축하기위한 소프트웨어가 "Swift"이다. Swift는 현재 클라우드 인프라를 구축하기위한 소프트웨어 개발 프로젝트 "OpenStack"의 일부로서 개발이 진행되고있다. 이러한 스토리지 시스템은 안정성이 중요하지만, Swift는 기존 기술을 조합 한 구조로되어 있으며 미국의 호스팅 서비스 사업자 Rackspace 의한 상용 서비스 'Cloud Files "에서 사용 된 기술을 기반하고있다. 큰 문제 등 지금까지보고되지 않고 이미 충분히 실용 단계에있는 소프트웨어라고 할 수있다.